Hello!
I'd like to invite you to follow me on twitter at Serynarpc at twitter. Follow me there - and here- and enjoy this discount!
Coupon for twitter & blog followers: 20% off with *code twitter* from entire stock http://www.etsy.com/shop/Serynanne
I'm not planning on ending this code any time soon, so feel free to stick it in your pocket for someone's upcoming birthday :)
Enjoy!
Thursday, July 28, 2011
Wednesday, July 27, 2011
New line of cards: butterflies
I'd like to share that I will be posting up many butterfly themed
items in the shop lately. There will be whimsical and pretty to natural looking!
I'd love your feedback on what sort of flowers they should be visiting!
Feel free to visit the current butterfly listings here:
Butterfly, daisy and tulip card:


Butterfly Whimsy kit
Butterfly in the hoop decor
Any ideas for more?
Hand sewn gift for loved ones of children
Hello!
I hope that this finds you well. Do you have an upcoming event that would be nicer with a gift for a loved one? Gather your child to help make a special gift for Grandma or Auntie :)
You can find the hand sewn tutorial here:
http://thepoint.handmadeinpa.net/tutorial-embroidery-handprints-awesome-personal-gift/
I hope you enjoy!
DIY stacking bracelet tutorial by honestly WTF
I was doing my normal twitter activity (EtsyNEAT was active today!) when I saw a DIY tutorial float by. Intrigued, I clicked it and was taken to a magical land of honey, chocolate fountains and leather cording.
Back to reality, this tutorial looks like I could do it - and I love the color combination chosen for the example.
Check it out- these are stackable and delicious!
http://honestlywtf.com/diy/diy-wrap-bracelet/
Back to reality, this tutorial looks like I could do it - and I love the color combination chosen for the example.
Check it out- these are stackable and delicious!
http://honestlywtf.com/diy/diy-wrap-bracelet/
Tuesday, July 26, 2011
Butterfly tutorial

Put on the kettle for a pot of tea... gather your silk ribbon and embroidery basket... find a nice, sunny spot to sit for a spell. Lets travel back to a time where silk ribbon embroidery was the at its height - the 17th century.
Thats right... another tutorial slash sneak peek at a new kit hitting my etsy store :)
I sketched this awhile ago when I sold a Blue flowers kit. Some of my favorite flowers (that can be blue and complementary shades of violet and purple) are delphinium and foxgloves that would fit the kit nicely!
So I included the sketch and iron on transfer of my Butterfly whimsy:
 This was largely inspired by my new purchase of a book that promised to teach me how to make butterflies in silk ribbon embroidery. Let me tell you a little secret. You already know how to make butterflies in silk ribbon embroidery.
It is simple and pretty - and lets get started.
You are going to use this and the simple ribbon stitch to make beautiful butterflies, daisies, irises and bluebells.
Things you will need:
*Silk ribbon. Craft stores are not stocking this for some reason, but you can get bucilla lots on ebay for cheap (don't overpay, they sold for a buck or two in their time) or lots of silk ribbon hand dyed by professionals between 20 - 40$
You can also grab my silk sets:
http://www.etsy.com/shop/Serynanne?section_id=7670966
*embroidery floss in green, blue to match your bluebells and colors for the butterfly bodies and antennae. Choose earth tones or flights of fancy, whatever you want!
*Fabric
*hoop
*transfer pen
Step one: Put the fabric in the embroidery hoop. With your transfer pen, draw a fun pattern onto your fabric. Keep the drawing simple- you are going to have to stitch over or wash this out after you are done embroidering.
Straight lines can be foxgloves and irises, small lines can be butterfly wings.
Step two: Approach your butterflies with your selected two strand embroidery floss.
 Stitch a straight stitch for the body. Make a french knot for the head and a small stitch for the antennae.
 Tie off the embroidery floss.
Step three:

Now the fun part- lock on your silk ribbon. Stitch the upper wing first so that the lower wing will have fullness. You can use a padded stitch nicely here:
To use a padded stitch, make a simple ribbon stitch - place the ribbon flat against the fabric and place the needle through the ribbon, pulling it through smoothly.

Then bring your needle up very close to where you began the previous stitch.
 Lay the ribbon over the first ribbon stitch, laying the ribbon flat. Push the end of the ribbon towards where you brought the needle up to make a small ribbon 'hill'. Place the needle through the ribbon over the previous stitch, bringing the needle through smoothly.
This may take some practice to get, but it makes nice raised stitches.
Congratulations! You have made your first silk ribbon butterfly!
If you need any advice, post in here.
You can purchase the full kit assembled and ready to go here:
http://www.etsy.com/listing/78563959/silk-ribbon-embroidery-kit-butterfly
Saturday, July 23, 2011
For all of the Quilters - or would be quilters
Hello!
I have come across an excellent quilting blog, Road home Quilting. It has quite a resource library for quilters, including features such as Tech Tuesday where you learn how to use your computer as an ally in your quilting.
Think I might have to turn my mom onto that page!
The page that caught my attention is this lovely tutorial on how to quilt 'Valor'
http://roadhomequilting.blogspot.com/2011/07/very-easy-valor.html
It would be a perfect time to start practicing with a whole year until the next 4th of July. It would be a great gift to a family of a service member!
Thursday, July 21, 2011
Found: Coaster Tutorial
Hello,
Sorry for the absence from the blog! My tenodonosis has flared up thanks to longer hours at the day job. My stitching tends to just be an hour a night now. I have nothing to show you right now!
I did find an awesome tutorial on how to sew reversible coasters. These require a machine to do the embroidery, but I'm going to try it by hand.
http://www.thesplitstitch.com/2010/12/tutorial-quickie-coasters.html?showComment=1311291906529#c5441261130753795490
I love the bright, cheery colors - especially on the bird coasters!
Monday, July 4, 2011
Remember those new iris cards...Heres one!


http://www.etsy.com/listing/77183066/pink-iris-blank-card-in-silk-ribbon
Remember, you can try your hand at making cards like this with the silk ribbon offered in my giveaway!
Sunday, July 3, 2011
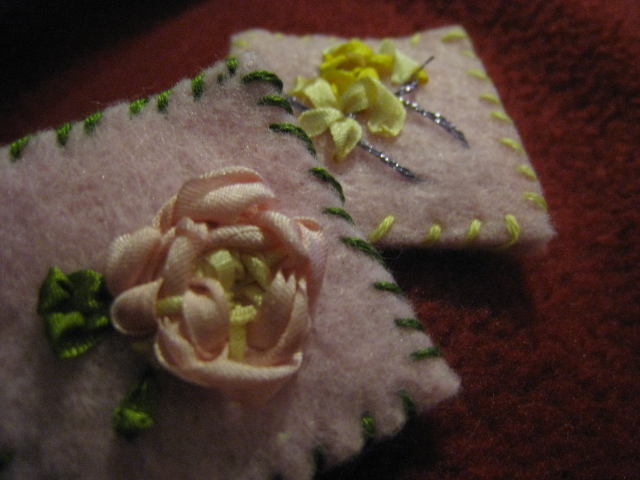
Felties!
 Feltie pink roses and daffodils + pins! A fun little accessory!
Any one like them? Any color ideas?
I think pink and white, blue and red would be fantastic!


Spool of Silk Giveaway!

You win one full spool of your choice of silk! The silk is 2 MM + 4 MM.
To enter:
1. Blog about the giveaway, linking here!
2. Comment here about a favorite item in my shop, linked below

I will post here on this blog on Sunday, June 10th, with the winner. Come back then to see if you have one. Comment back with which color you would like :)
Friday, July 1, 2011
Working card
 Hello!
I'm working on a bit of shiny. It may fit on a card! I'll iron it our when I go to Mom's on Sunday. I love her iron. It has bells and whistles!
Subscribe to:
Posts (Atom)